Showing posts with label pamphlet stitch. Show all posts

August 27, 2013

Paper Circuit Projects from Maker Faire Detroit 2013

Part 2:Books

Here are the book projects that were shown at Maker Faire Detroit this year.

LED Spine


This is the completed project that I wrote about here: using pamphlet stitch to hold LEDs. The use of beads along the spine sewing seemed to work out securing the LEDs in place. At least at home and for the first day of Maker Faire. The second day, the LEDs were finicky in their contact as well as the battery contacts.


The day was cool and not all that humid (strange words to be said for Maker Faire as the previous years were quite hot and humid), but it wasn't all that dry, either. Paper reacts to moisture (and lack thereof) but I'm not all that sure that was the problem. Needless to say, this structure needs work and the ways to improve are already forming in my head.


I like the idea of using the spines as a grid to move around LEDs to make patterns and letters so I want to keep working at it to make the structure more stable. I will post my progress.


Starlight Book

Despite a design flaw, I have to admit, I'm rather pleased how the Starlight book turned out.


(I really need to figure out how to take pictures to show lit LEDs)

The flaw: I had to tell people to put the magnet in place (in order to close the circuit).

cover with magnet switch in its best door knocker disguise

magnet in place to close the circuit

I was conscious of this while I was making it but I consider this (all of the projects, really) as prototypes just to get the "mechanics" in place and see if the structure is viable. Luckily, the venue of Maker Faire is for sharing ideas and, in this spirit, I felt confident to "make it public". Once I work through a graceful solution, I'll let you guys know.


Big Dipper Book

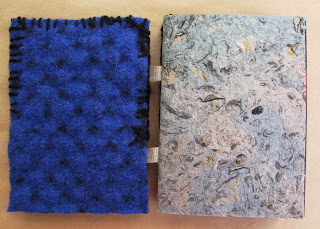
This last book is really a soft circuit project as I used conductive thread for the circuit path. The covers were felted (technically fulled) sweaters and the binding structure is known as "sewing on tapes". These linen tapes used for binding the book carried the conductive thread/circuit path from the LEDs on the front cover to the batteries on the inside back cover. Again, and I'm sure you're getting sick of me saying this (but get used to it), it's a prototype, so the blanket stitching to hold the two layers that make up the covers is sloppy and was only done halfway so I could show how the structure was put together.


front cover

 spine

back cover

I used two layers of fabric so the battery holders wouldn't be exposed. They could, however, still be accessed through flaps cut in the top layer of fabric. (The two layers of linen tape is explained following these pictures.)


Because I was using two layers of fabric, I decided to use two layers of linen tape: one for the conductive thread and the other to give the structure more stability. It also aided in holding the battery opening flaps in place.

inside of front cover and first page 
(let the beautiful paper distract you from the bad stitching)

I forgot to note on the picture that the second/bottom sewing tape was glued to the fabric.


Surface mounted LEDs were used for this book. To make them "sewable", I soldered tube crimps, the kind used in jewelry making, to each side. I used a black fabric to suggest the night sky which was a good design decision but an awful demonstration decision. Apologies.


If you have any questions, please feel free to ask in the comments or send me an email via the little widget thingie found on the right side of the blog.

I'm going to put the papermaking projects in a separate post so plan on coming back to read about that!

June 22, 2013

Problem Solving and Tweaking

I had an idea for using the stitches made when doing a pamphlet stitch as "holders" for LEDs in a very basic circuit. I wondered, however, if the holes made when stitching and/or the thread itself would compromise the circuit.

Guess what?

It doesn't!

I made a sample with the copper tape on just one sheet of paper and sewed a five hole pamphlet stitch pattern on it. I also tore some holes due to using the same force I usually use when sewing a book to tighten the slack, not thinking that I'm only going through one sheet of paper. Yikes! But this is what happens when one is impatient.

Giant hole due to eagerness in scientific exploration.

However, I figured if it worked like this, it would work when sewn neatly and if it didn't, I could try again. I grabbed the battery and crossed my fingers. Success! On to making a book!

I needed to make a prototype book. I have a bigger project in mind but it hinges on this book structure. I decided to make it small, about the size of the paper model. After a couple false starts of 1: not allowing for thickness of the battery and 2: cutting the battery opening too large, I ended up with this:

 I know it's hard to see but the LEDs do light up.

There are some issues, though, that I need to work on. 1: There isn't enough contact with the LEDs on the spine when the book is closed. 2: I need to work on shaping the leads on the LEDs, maybe cutting them before curling and/or bending the legs at a right angle before curling. Working on 2. should help with 1. I'll also try backing the spine with a piece of card stock to make it stiffer.

Although it's nice when things fall into place right from the start, I also enjoy the problem solving aspect of making books. It's true you learn from your mistakes and that knowledge helps in other projects as well.


August 2, 2012

Recruiting Bookies at Maker Faire Detroit

Even though my table at Maker Faire seemed to be off the beaten path, it was flanked by two awesome planes (which I neglected to get information about), so there was nothing to complain about. It even added another dimension to the project name of  "Bound and Determined".


I met many wonderful people and was able to give several lessons on the three-hole pamphlet stitch in the free make-and-take. It was heartening to see the interest and I was impressed with everyone's sewing abilities!


 I had to adjust my plan for the Maker Intention flags a bit. When making prototypes at home, I spray starched the fabric (nine times (!) so it was stiff enough to act somewhat like paper) and then sewed it directly onto the paper "spine". However, it seemed that starching them in advance, along with the humid weather we had right before Maker Faire Detroit opened caused the fabric to lose its crispness. (We finally got much needed rain, a good news/bad news scenario because of Maker Faire.) This made it rather clumsy for the budding bookmakers to sew in. After the first three or four brave and undeterred (or should I say "determined", nyuk, nyuk) binders, I decided to have people just write their maker intention on the fabric and I sewed them in during and after Maker Faire. Apologies and kudos to those initial intrepid makers!


It was fun to see what everyone thought of to fill out the statement "It's fun to make ...". It ranged from the philosophical "sense" and "people laugh" to the practical "apple pie" and "small humans". Two people wrote "zombies" so maybe the "2012 is the end of the world" prediction might not be far off. However, the "stormtroopers" and "robots" will take care of them.


Many thanks to all who took the time to learn a new skill and engage in an art project that may or may not have made sense to you!!!!


Stay tuned to see the flags flying in my garden!

July 18, 2012

Prepping for Maker Faire Detroit

To determine if the paper I chose for the spine of the Maker Intention Flags would be strong enough to withstand the weather, I made a mock up of just one strip to put in the yard.


Unfortunately (really, really unfortunate and not just for this experiment), I've only had a total of maybe fifteen minutes of rain in the past four weeks. (Official weather stats record 1.48 inches of rain on 7/3/12. This did not happen anywhere near my house.) It has gotten about fifteen to twenty seconds a day of shower by hose when I moved it next to a potted plant.

(Funky colors courtesy of failing camera.)

It seems to be doing OK but I'm planning on pasting in a cloth liner just to be safe. Fall will eventually come and with it, hopefully, the rain.

Since I will be teaching people how to do the pamphlet stitch, I thought it would be good to show some different ways it can be used. I have been having fun constructing models and, as I do them, I generate even more ideas. Unfortunately, I won't be able to do all the ones I want before Maker Faire due to other tasks that need to be done. (Why is it that the actual time it takes to do a task is always 3.59 times more than you plan on it taking?) However, I plan on doing some during Maker Faire and exploring this simple stitch more afterwards. I'll tag team my Keith Smith project and this one.

Here are some of the models:
(Apologies for the photo quality. My camera is not playing nice and these are stills from a Flip camera video.)


Beaded Spine

Three signatures sewn separately

 Two signatures with tunnel

 Two signatures with tunnel top view

Two signatures with pocket