Showing posts with label Maker Faire Detroit. Show all posts

August 2, 2014

Maker Faire Detroit 2014

Maker Faire Detroit came and went with a flurry of angst, curses, laughs, the meeting of interesting people, the exchanging of ideas and near pathological word finding difficulties. While I'm sure some other Makers had a bit of their share of "pre-show" angst and cursing, I'm almost positive I was the only one with near clinical word finding difficulties. If you happened to be one of the wonderful people who visited my booth when I was having a "spell," my apologies and gratitude for your kindness.

setting up the booth
still verbally coherent at this point


I was able to get some Circuit Stickers, developed by my role model Jie Qi and Bunnie, before the event. These LED stickers eliminate the need to bend and curl the legs of bulb LEDs and then having to attach them to the copper tape either with tape or solder. They are extremely easy to use and allow you to finish the project much quicker.

(image taken from Crowd Supply website)


I only was able to get some white LED Circuit Stickers before Maker Faire so I couldn't play with the effects stickers or the microcontroller and sensor stickers that are available. At the Faire, one of the other Makers alerted me to the fact that they were selling the Starter Kit (which includes a very nice book  that explains basic electronics and circuits as well as showing some paper circuit projects) and both the white and color LEDs at the Maker Shed located in the outdoor arena of Maker Faire Detroit! Not only did I make a beeline over there to purchase some for myself, but I was able to direct interested people for some instant gratification (well, maybe not instant instant, but you know what I mean).

Go get Circuit Stickers online from Chibitronics and The Maker Shed!!


New projects for this year:

House frame featuring my dad and me.           


 Amigurumi zombie
This is a combination of two wonderful patterns designed by Kerstin Batz and can be found on the Zombie Murphy pattern page and the Zombie Martha pattern page on Ravelry or on her website with Zombie Murphy pattern here and Zombie Martha pattern here.

        
Oracle of Ni book

Notebook with flashlight
     

I will be posting pictures with more details as soon as I can.

This was my fifth year as a Maker at Maker Faire Detroit and once again it was such joy to be able to exchange knowledge and information with the many people who visited my booth. I learned quite a lot from people who stopped by as they told their stories and were generous with advice and wisdom. I think that's the best part of Maker Faire and why I aspire to be a part of it every year.


January 15, 2014

Maker Intention Flags Last Expression

I have been privileged to be a participant in Maker Faire Detroit since it began in 2010. In 2012, I wanted to continue with making a community art project, as I had with The Purl Street Scarf Project and Flower Power (in 2010 and 2011, respectively), but with a bookbinding theme. You can see pictures and read about the process at the blog set up strictly to communicate these projects at The Purl Street Scarf Project. However, so you can see the final product of each:

The Purl Street Scarf Project
Maker Faire Detroit 2010

Flower Power: Making Waves with Yarn
Maker Faire Detroit 2011

For Maker Faire Detroit 2012, I had on display various bookbinding techniques and also provided a free make and take to teach a simple three-hole pamphlet stitch. I also had the idea of people writing down on fabric "flags" what they would like to make and use the same stitch to secure it to a base. These "Maker Intention Flags", based on prayer flags, would then hang in my backyard. While the process changed, due to the sewing of the flag onto the base being too fiddly for newly inducted bookbinders, I still asked people to write down their Maker intentions on the flags which I then sewed onto the base.

Table set up at Maker Faire Detroit 2012

You can read more about the project at Maker Faire Detroit 2012 here and the finished project (at its beginning) here.

Maker Intention Flags at the beginning

The flags flew in my backyard for 15 months. They actually lasted quite well. Sure, the final product was faded and beat up and along the way I had to use clothes pins to attach it to the shepherd's hooks and where one line split in two, but for being 15 months in rain, snow, high winds and sun, I think it held up great! (Bonus real world testing: Tsukineko StazOn black ink held up better than Sanford Sharpie ink.)

Maker Intention Flags through the seasons

And here are some close up before and after shots of the flags:

BEFORE

AFTER

BEFORE

AFTER

As with prayer flags, these Maker Intention flags were meant to fly for a while and then burned to release their "last expression" of intention into the universe. This past winter solstice I did just that. Despite the drizzling rain, the flags were burned on December 21, 2013 (later than I had wanted to as I remembered I didn't photograph the flags and was scrambling under less than ideal photographic circumstances.)


It is my hope that all the intentions will become (or have become/are continually becoming) reality. Even the zombie one. We all just need to make that first step, the step of intention, to start us on the journey. Intention leads to thought and contemplation which leads to ideas which leads to the urge to make. That, unfortunately, is where we can stall. Don't fight that urge! Make it! Even if it turns out crappy. Make another crappy one. Maybe you'll hate doing the process. That's OK. At least now you know. It's kind of like those cute shoes you want until you try them on and experience what foot binding must have felt like. Either try a different process or try something else but don't give up because the first time wasn't perfect or a transcendental experience.

Embrace crappy outcomes because they give you much more information and a better education. And then, like magic, you'll be making wonderful purses, origami, dances, apple pies, robots and, yes, even zombies because those first crappy outcomes composted into perfection and a transcendental experience!

Go make something! Start with an intention!


September 9, 2013

Paper Circuit Projects from Maker Faire Detroit 2013

Part 3: Papermaking (and 1 origami)

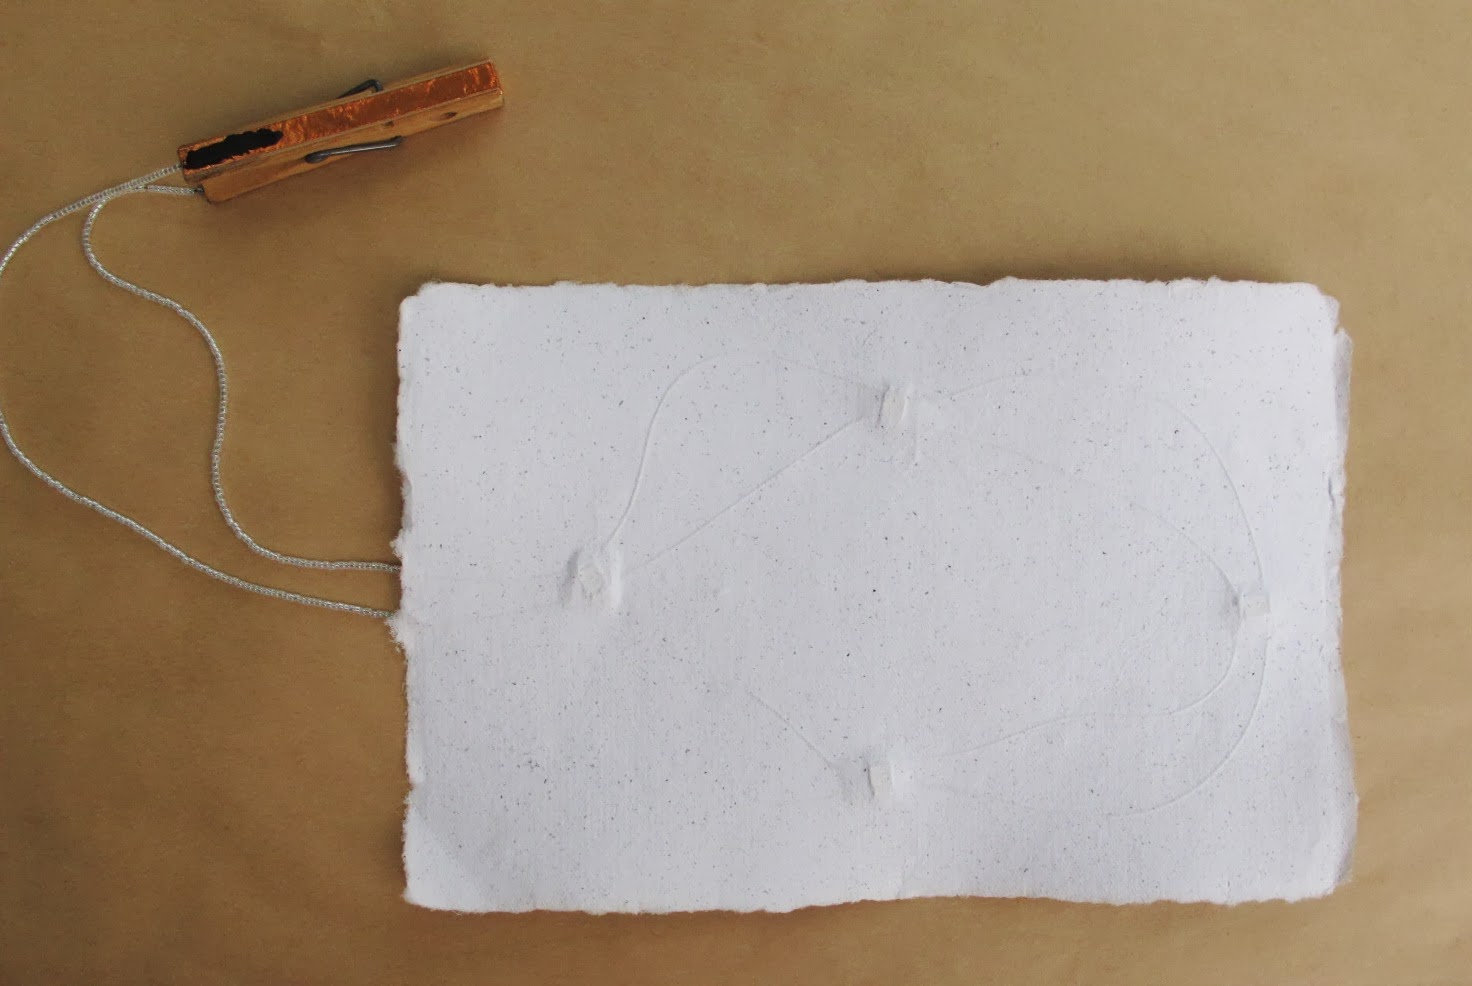
I only did three handmade paper projects because I wasn't sure they would even work after being encased in wet pulp for several hours. And then there's the issue of having a power source. Like it just couldn't be enough that I want them to light up. In fact, this is my second biggest problem: how to incorporate  the battery as a cohesive design unit. (My first is actually understanding this whole electronics world.) I did not achieve this goal with these items .... yet. I must plead dwindling time and a desire to share at Maker Faire for the provisional connection. (Yes, again. At least I didn't use "prototype" this time.)


However, the battery holder I used is a very simple, clever and brilliant connection that Hannah Perner-Wilson shared on her web site. My adaptation was to use Bare Conductive Electric Paint to "glue" the conductive thread onto the copper tape.


I used surface mount LEDs onto which I soldered tube crimps (the kind used in jewelry making). I then used conductive thread to loop through the tubes, being very mindful to keep all the positive sides on one thread and all the negative ones on the other. It was helpful that the LEDs I used had a little notch on its negative side. I also made sure that the positive side thread was longer at the end (the part coming out of the paper) to cue me, just like a bulb LED's positive "leg" is longer.


The basic procedure is: make LED and thread circuit; pull a sheet of paper; lay down thread circuit, making sure threads do not cross or touch each other; pull another sheet of paper and lay on top to sandwich the circuit; let dry on glass or non-porous surface.

I don't have a professional paper making set-up. I used Arnold Grummer's frames and screens and my couch sheets are fabric interfacing. The pulp was made from office paper printouts no longer useful/wanted. (I keep them around for when I do gluing.)

Learning from my mistakes, I placed beads on the threads before attaching the clothespin battery holder to act as insulators. I didn't do that with the following sheet of paper and I had to be very careful not to have the threads touch each other thereby creating a short circuit.


I could say I didn't feel like soldering those |)4^^|V crimp tubes on those |=V(|<ing tiny SM LEDs again, even though it's the truth. Instead, I'll say I wanted to try another design feature by using bulb type LEDs, which is also the truth but makes me seem more adventurous rather than lazy.


The procedure was basically the same except that for the LED and thread circuit path, I bent and coiled the legs of the LEDs and the thread was wrapped around these coils. When the second sheet was put on top, I used my fingers to poke the bulbs through and then sort of patted the pulp around it. I didn't even try to make it smooth for reasons mostly centering around the fact that I did not have any pharmaceuticals around when I would most assuredly go over the compulsive smoothing-out ledge. However, my official reason is "to incorporate texture as a design element".


This sheet was made this way so it could be cut down and folded into a simple origami koala face. I made the structure with plain paper to figure out where the eyes would be and then, when making the paper, placed the LEDs in approximately the same area. I used red "eyes" because I knew the paper would probably end up looking like intended an evil koala. (See how that works?)


Origami tulip


I wanted to see if I could use the copper tape paper circuit technique with an origami structure. I wanted to do a dragon but the patterns I found had too many fold and I couldn't figure out how to add the copper tape, LEDs and battery (damn that battery!). Even with the tulip structure I found, it took me a while to figure out how to make it work. I'm not saying it's difficult, just not so easy for me (and once you see it, you'll wonder what my problem was, but let's not judge).

But I did it!


The patten is from the book "The Origami Handbook" by Rick Beech and was designed by Kunihiko Kasahara.

I wanted to make it so when you pressed at a certain spot, the circuit would close and light up the LED. Then, you could use a clip to keep it on if you wanted. Like so:

And here's what the circuit looks like inside:


I think origami structures have a lot of potential with the copper tape paper circuit technique. Although, for me, the key seems to be structures without too many folds or, at least, the path for the circuit can't have many folds.

My hero, Jie Qi, has done some work using origami structures and flexinol wire. Check out her impressive flexinol wire paper circuit origami crane. I dare you to tell me you don't want to do the same thing even if you don't know WTF is going on.

If you have any questions about my projects, please don't hesitate to ask me either in the comment section or using the "Send me an email!" widget that Blogger has very usefully supplied.


August 27, 2013

Paper Circuit Projects from Maker Faire Detroit 2013

Part 2:Books

Here are the book projects that were shown at Maker Faire Detroit this year.

LED Spine


This is the completed project that I wrote about here: using pamphlet stitch to hold LEDs. The use of beads along the spine sewing seemed to work out securing the LEDs in place. At least at home and for the first day of Maker Faire. The second day, the LEDs were finicky in their contact as well as the battery contacts.


The day was cool and not all that humid (strange words to be said for Maker Faire as the previous years were quite hot and humid), but it wasn't all that dry, either. Paper reacts to moisture (and lack thereof) but I'm not all that sure that was the problem. Needless to say, this structure needs work and the ways to improve are already forming in my head.


I like the idea of using the spines as a grid to move around LEDs to make patterns and letters so I want to keep working at it to make the structure more stable. I will post my progress.


Starlight Book

Despite a design flaw, I have to admit, I'm rather pleased how the Starlight book turned out.


(I really need to figure out how to take pictures to show lit LEDs)

The flaw: I had to tell people to put the magnet in place (in order to close the circuit).

cover with magnet switch in its best door knocker disguise

magnet in place to close the circuit

I was conscious of this while I was making it but I consider this (all of the projects, really) as prototypes just to get the "mechanics" in place and see if the structure is viable. Luckily, the venue of Maker Faire is for sharing ideas and, in this spirit, I felt confident to "make it public". Once I work through a graceful solution, I'll let you guys know.


Big Dipper Book

This last book is really a soft circuit project as I used conductive thread for the circuit path. The covers were felted (technically fulled) sweaters and the binding structure is known as "sewing on tapes". These linen tapes used for binding the book carried the conductive thread/circuit path from the LEDs on the front cover to the batteries on the inside back cover. Again, and I'm sure you're getting sick of me saying this (but get used to it), it's a prototype, so the blanket stitching to hold the two layers that make up the covers is sloppy and was only done halfway so I could show how the structure was put together.


front cover

 spine

back cover

I used two layers of fabric so the battery holders wouldn't be exposed. They could, however, still be accessed through flaps cut in the top layer of fabric. (The two layers of linen tape is explained following these pictures.)


Because I was using two layers of fabric, I decided to use two layers of linen tape: one for the conductive thread and the other to give the structure more stability. It also aided in holding the battery opening flaps in place.

inside of front cover and first page 
(let the beautiful paper distract you from the bad stitching)

I forgot to note on the picture that the second/bottom sewing tape was glued to the fabric.


Surface mounted LEDs were used for this book. To make them "sewable", I soldered tube crimps, the kind used in jewelry making, to each side. I used a black fabric to suggest the night sky which was a good design decision but an awful demonstration decision. Apologies.


If you have any questions, please feel free to ask in the comments or send me an email via the little widget thingie found on the right side of the blog.

I'm going to put the papermaking projects in a separate post so plan on coming back to read about that!