

What you need:
- pipe cleaners (I got mine from Dollar Tree. Yay for cheap craft supplies!)
- scissors
- pencil
- hot glue
- needle-nose pliers (optional)
Instructions for shrubs:

These are the measurements I used for the shrubs in the picture. To be honest, the only measurements that are dead on accurate are for the gold piece and the two large green pieces. The five smaller pieces I cut by eye. You want them smaller than the two larger pieces, somewhat staggered in length. You can always trim them once they're all together. Also, you can make your shrub bigger or smaller.
I used a highlighting pen and wire for the first two pictures because it was just too hard to photograph with the pipe cleaner, it being all fuzzy and shiny. You need to pretend the highlighting pen is a pencil and the wire is the pipe cleaner.
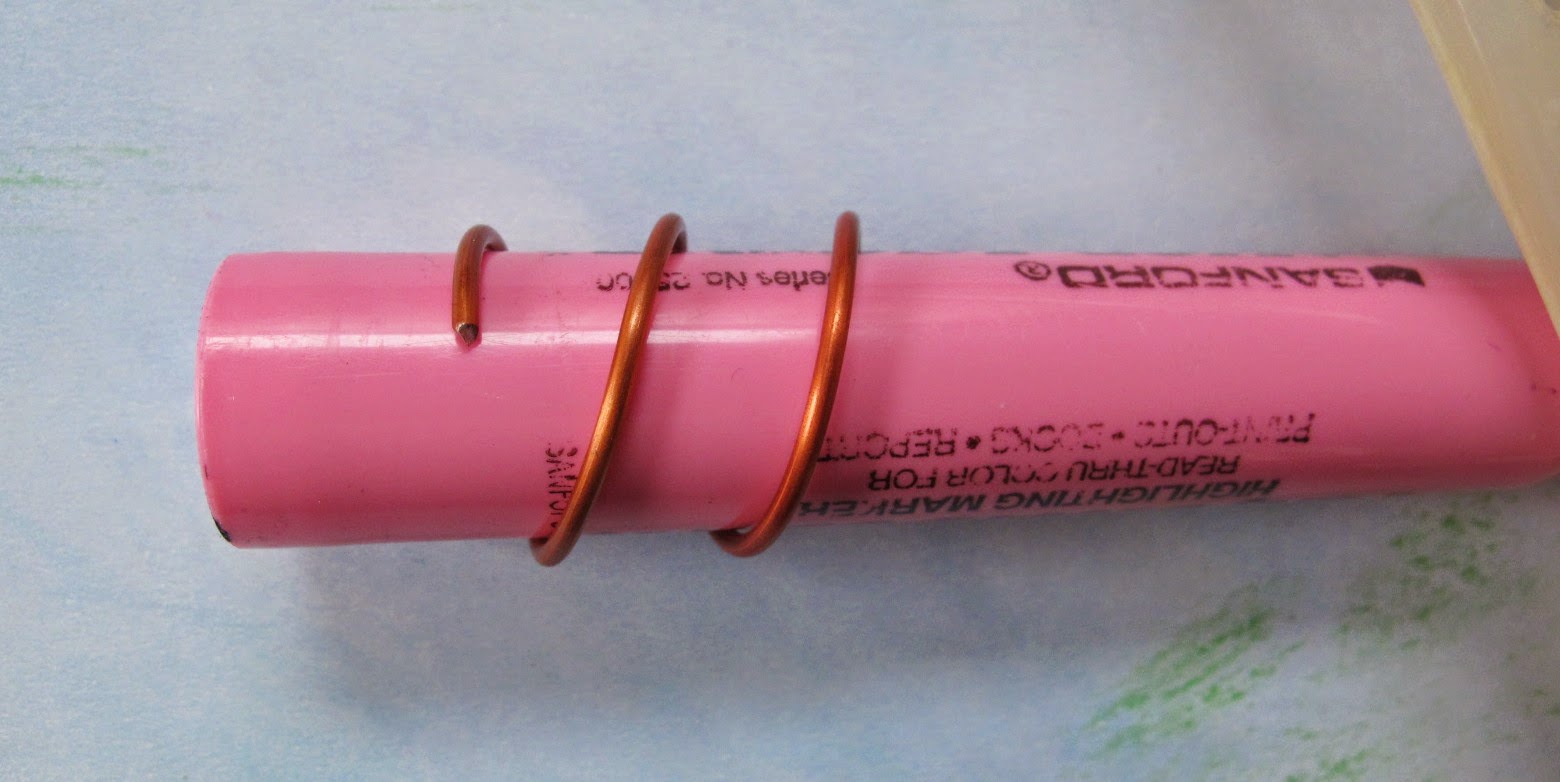
Wrap the gold pipe cleaner around a pencil.

Then tuck in/wrap the two end pieces to hold the ring together.

Stuff the green pieces through the ring. Put the two larger pieces in first and the smaller pieces around them. Push them about half way through the ring. Make sure even the small pieces are coming through, even if just a little bit.

Now, carefully and slowly, push all the pieces up so that they are level with the bottom of the gold ring. With your thumb on the bottom, press the green pieces down to make sure the smaller pieces aren't "floating" but making contact with your thumb. This is so all the pieces will be glued in place.
You can try and rearrange the pieces at this point but they'll probably all fall out. It's better to glue it down first and the "fluff" the piece by moving the "branches" around. It is supposed to be a natural object after all, so variation is encouraged.
Using hot glue,you can either glue the piece directly on your Glitter House base or glue it onto wax paper or one of those silicone craft sheets. The wax paper will leave a bit of paper residue on the glue but you won't see it. The only advantage of gluing it together first is if you want a lot of shrubbery and don't want to risk them falling apart while you're landscaping (if you knock it on the floor, the cat starts to play with them, etc.).
Instructions for tree:

Once again, these are the measurements I used for the tree in the picture. I forgot to put in another three inch gold piece for the base. You may want your tree taller or shorter or with more branches.

Start with the longer green pieces and wrap around the gold "trunk."

Continue wrapping the other pieces opposite each other. Keep it flat for now so you don't drive yourself crazy.

Push the branches down so they're closer together.

Continue adding branches (and pushing down as much as you can to condense them) until you have as many branches as you want.

Move the branches around in a pleasing shape. You can either leave a little gold at the top or trim it even with the branches. I left a little gold at the top and then curved it around with needle-nose pliers (you could use your fingers). It made me think of a star on top of the tree. Although not shown in the picture, this is when you can trim the branches so it makes the tree shape that you want.

This is where the gold piece I forgot to include in the first picture comes in. Wrap the piece around a pencil and tuck in the ends, like with the shrub piece. Stick the tree inside the ring. It won't be a tight fit but it gives some stability when gluing in place.
Bonus! How to turn a miniature bottle brush tree into a shrub:

I don't remember exactly where I got my bag of miniature bottle brush trees. I'm sure it was from a craft store during their after-Christmas sale (get your supplies for next year!!!).

Cut off the top.

Pull the branches upward.

Trim it into a pleasing shape. You may or may not need to add white paint on the tips. (I didn't in this picture.) If you do, why not add some glitter as well!
I hope this helps and inspires you to landscape your Glitter House Project. If you come up with any clever adaptations or hacks of your own and would like to share, I would love to hear from you!
No comments:
Post a Comment