

Christmas is the season of sparkle and lights! I grew up with glitter houses under the tree with little plastic or lead people milling about.
 |
| I know you can't see them too well but they are under the tree in front. |
So, I thought a little bit of nostalgia combined with the new technology of Circuit Stickers would make a great combination. If you don't know what Circuit Stickers are, please peruse the Chibitronics website to learn more about this wonderful product! All I'll say here is that they are LEDs on stickers. Slap them on some copper tape, add a battery and you can easily add light to a project!
First, a few warnings about this tutorial.
WARNING 1: This is a looooong tutorial. It's not that the project is complicated, but I like to include a lot of pictures as my verbal skills sometimes lack. I also like to give alternatives and that adds to the length.
WARNING 2: The order presented is just a guide. My process of doing things may not be the same as yours. If, as you're reading, think, "I'd do it differently", please, follow your own sensibility.
WARNING 3: There is a whole lot of glitter involved. Lots. There will be glitter everywhere. Probably until July. Maybe longer. However, the lint collected from your dryer will be festive.
WARNING 4: I'm assuming you have some knowledge of a basic circuit and how Circuit Stickers work. If you don't, this is a short video on Chibitronics website that explains it. Also, I'll be referring you to Jie Qi's quintessential paper battery holder and tutorial when that step comes up because 1) it would make a long tutorial even longer if I added it in and 2) she really has the quintessential template and tutorial.
What's happening circuit-wise
The basic concept of this project is the use of a "visitor" to the house that acts as a switch to complete the circuit and turn on the lights.

What you need
Materials:
- chipboard: cereal box or any other box of that weight, can also use the back of a writing tablet (needs to be at least 7.75 x 3.5 inches) (for house)
- foam core or corrugated cardboard (for base)
- colored vellum, tissue paper, colored cellophane, colored acetate, printed acetate (for windows)
- small piece of card stock (for door)
- copy paper (to cover base)
- small figurine somewhat in proportion to house (for "visitor") I used a mini ornament with the string cut off. Look around your house and see if you have any little toy or ornament that could fit.
- small pieces of metal: can use cookie/candy/tea tins (used for on/off position of visitor)
- magnet (the size of the bottom of your visitor)
- craft paint
- glue (various ones used and suggested but it's up to you)
- double stick tape (optional if you don't like glue)
- GLITTER! (I used one of the opaque hologram type glitters, specifically, Sprinklers premium glitter by Creative Beginnings that I found at JoAnn Fabric and Craft Store)
- Circuit Stickers
- copper tape
- CR2032 battery
Tools:
- scissors
- craft knife
- pencil
- craft paint brushes
- bone folder or non-serrated butter knife or large paperclip (for scoring)
- awl or pushpin or needle (for marking) (optional)
- transfer paper (optional, only if you have it lying around already)
- patience
Template for house
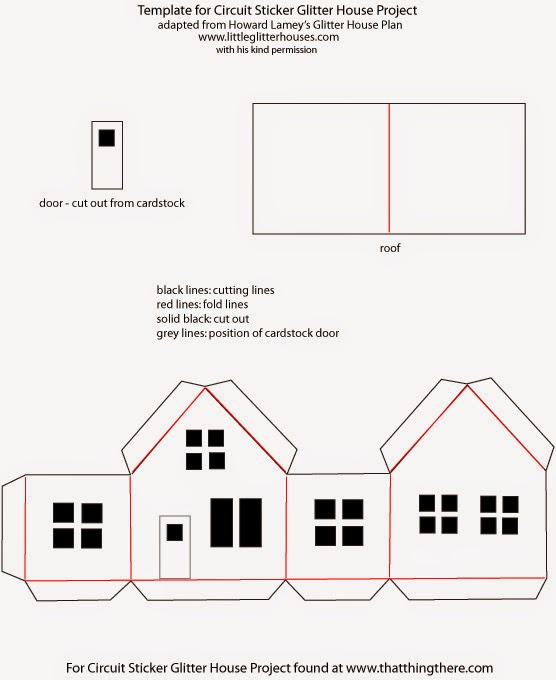
Click on the above picture to download the template to make the house. A word of thanks and praise goes to Howard Lamey of Little Glitter Houses. I adapted this pattern from his tutorial (which can be seen here) with his permission. Please, please, please, grab a beverage and go to his incredible website. There are tutorials of all sorts, patterns you can download and pictures that will inspire and delight you.
This tutorial is for a very basic house but you can do so much more. Do yourself a favor and visit his website. (Spoiler: there's even a house for Halloween!)
All right then, allons-y!
1. Download and print template.
Printing on heavier paper, like cardstock, may be a bit better but not necessary.
2. Transfer template to chipboard.
Tape the template onto chipboard using painter's, masking or sticky tape that you applied to your clothing and then pulled off a couple times. Why? It picks up lint and makes it less sticky so you can take it off without ripping the paper and/or chipboard.

Trace the outside with a pencil, mark the windows and score lines. You can use a bone folder, non-serrated butter knife or even a large paper clip to mark the score lines. For the windows, I used an awl to mark the corners (you could use a pushpin or a needle) and used the marks as a cutting guide. Other options to employ are transfer paper/carbon paper or cutting out the windows with the template in place. (Make sure you use a sharp knife!)
 |
| You can see the first cuts I did with a dull blade. You'll know it's dull if it pulls and tears the paper. |
 |
| template drawn and marked on chipboard |
 |
| cut out and scored |
3.Paint the house.

I painted the inside of the house with two coats of white. I did it for better light reflection. I may or may not be right with this hypothesis. Therefore, I'm making this step optional. Go with your gut.

Be aware of drips coming through if you paint the inside so you don't have little globs of paint. (You may like the texture. If so, ignore me.)

I did a base coat of white before painting two coats of color. Again, I did no tests to determine if it affected the brightness of the color but that's what I did.
4. Things to do while paint is drying
While it's true you could use a blow dryer to dry your paint, and I did that for my first coats, it's probably best that you let the final coat dry naturally. Even if you use a dryer for all the coats, you still need to do the following things.
Here are some things to do:

As I stated briefly in the beginning, the "visitor" will be acting as a switch to complete the circuit. Therefore, it needs to have a magnet on the bottom to bridge the gap in the circuit. If your magnet is being repurposed from somewhere (like mine) and has gunk on it that is preventing the metal to metal contact (like mine), just put some of the copper tape on it, like this:

Other things to do:
Use the paper template to cut out paper for the windows.
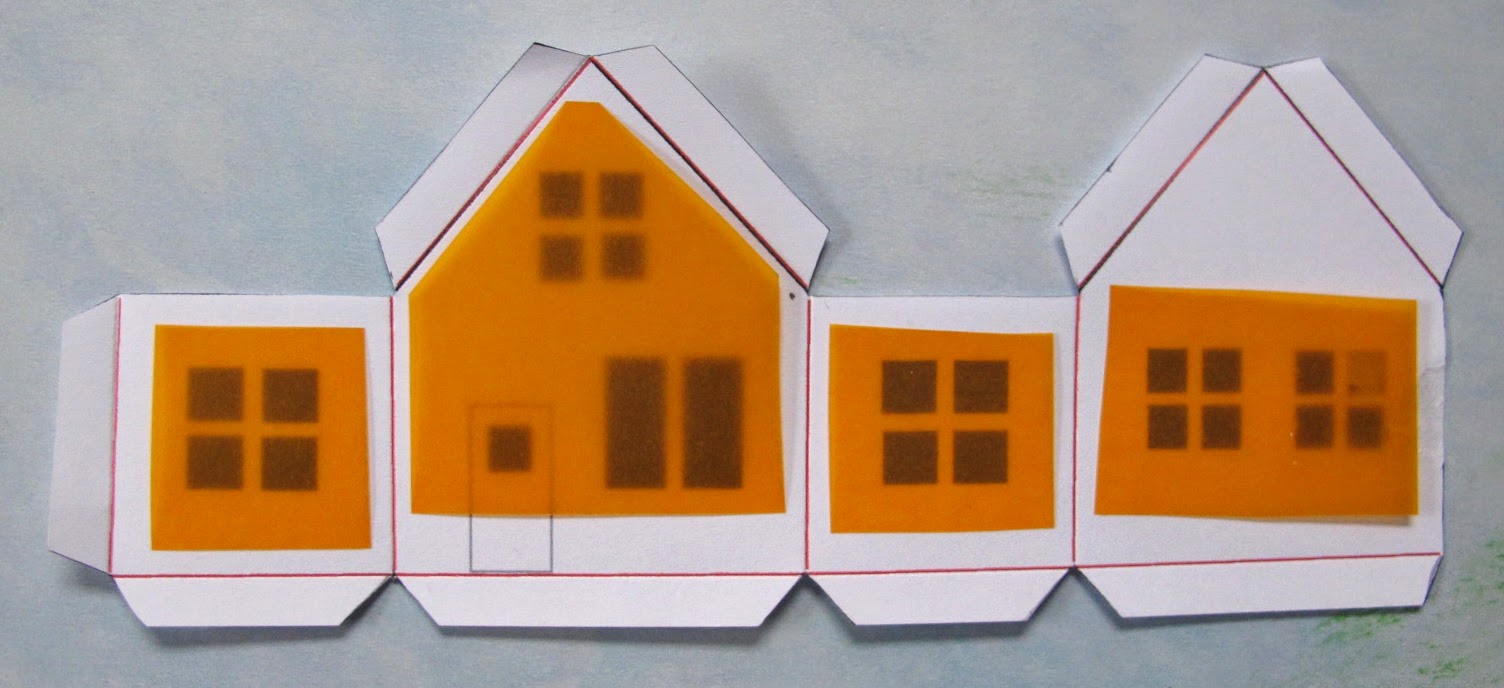
You can just eyeball the dimensions. They don't need to be all that precise but you do need enough excess around for the glue or double stick tape.
A note on the paper. I used colored vellum. The paper,not the animal skin. You could also use tissue paper (in my practice house, two layers seemed to work good), cellophane, colored acetate or the type of acetate that you can print on with your ink jet or laser printer (in which case you could get crazy and print a little scene). You may think of other fun things! (If you do, please send me a message!)
Make the base for the house.

I used foam core for my house because I had some already. If you don't have foam core, use two pieces of corrugated cardboard instead. The picture above are the dimensions of the foam core and the paper (copy paper) I used.
The process to cover the foam core/cardboard is as follows:

- Glue foam core/cardboard to the larger piece of paper. Miter corners the distance of the width of the foam core (or the two pieces of cardboard).
- Glue two opposite sides and then the other two. Make sure to "tuck in" the corners. (A larger picture showing this is below.)
- Glue the smaller piece of paper on top.
- Optional but nice finishing feature: Tap on the corners with a bone folder or something stiff and flat. This rounds the corners a bit so they're not so pointy.
 |
| Close-up of tucked in corner |
P.S. You now know how to cover book board if you want to make a book.
5. Adhere paper for windows and (not shown) door to the front of the house.
 |
| Do this before gluing/taping house together otherwise you'll have to do what I did: swear a bunch and carefully take it apart. |
6. Glue bottom of house together.

You could also use double stick tape, if it's the heavy duty kind. Otherwise, you'll probably need to clamp it until the glue dries.
You may want to touch up the corners with paint but the glitter hides a lot of flaws.
And, yes, just do the bottom of the house for now.
7. Determine position of house on the base.
OK, this is how I did it. You may think differently so do it how it feels right for you. I'm sure a big thing will be the use of awl pricks for placement. I'm coming at it from my book making classes where many times this was the method instead of using pencil marks.

- On scrap paper, draw around the outside perimeter of the house and the inside perimeter.
- You'll end up with a template like this.
- Position template on the base where it is most pleasing to you.
- Make awl pricks on the inside of the lines both for the outside perimeter and the inside perimeter. You want to make guidelines that are a bit smaller than the house so they are covered once you adhere the house to the base.

Take the template off and lightly draw lines. These will be your guides when putting in the copper tape circuit.
8. Determine where your visitor will be completing the circuit.

Set the house on the base where you drew the guide lines. Position where the visitor will need to be to bridge the open circuit. I put a awl prick, you can also mark it with a pencil. It doesn't need to be extremely precise.
9. Measure, cut and glue metal for switch.

I made my piece slightly larger than the door and slightly longer than the mark I made in the previous step. My metal piece measured 1 x 0.5 inches but please go by your own measurements. I used E-6000 glue.
10. Put in circuit.
Here is where I will refer you to Jie Qi's quintessential paper battery holder and copper tape circuit tutorial.
- Fabulous paper battery holder template.
- Quintessential tutorial.
- This video doesn't show the battery holder but it does show how to make the paths.
Some of my own tips:
- Pre-fold the battery holder with the battery in place to give the paper "memory".
- To decrease waste of the copper tape, use a piece of string or yarn to measure how much you will need.
- Glue the battery holder in place last, after you've placed the copper tape.
- For the "strap" that holds the battery in, place glue on the tab and tuck it under with the battery in place so that you know it won't be too tight or too loose. Then, take the battery out, press to ensure adhesion and let dry.
- MAKE SURE THE TAPE AND STICKERS ARE ADHERED FIRMLY!! You are going to be using gobs of glitter so use a bone folder or the back of a spoon to make sure there are no gaps that the glitter can get under.
 |
| underside of base |
 |
| top of base |
 |
| close-up of circuit with LEDs |
 |
| circuit paths identified |
A note on the amount of lights: my practice house had only two lights and it was fine. You really don't need three to illuminate the house. I don't know, maybe it's the more cowbell/goes to 11 syndrome but I wanted three lights. Try two lights and put your house on top of the lights (make sure to place the roof on top, it doesn't need to be glued) and see if you like it or not.
11. Cut flaps on bottom of house for circuit paths.
This step is the reason I didn't put the roof on the house earlier and it's this step I forgot when I was writing up this tutorial. This is the better way to do it:

Place house in position on the base (where your guidelines are) and mark where you need to cut. I actually used pencil marks this time.
If you get ahead of yourself and already put on the roof, you need to mark it like this:

It's not a catastrophe but it is easier doing it the other way.
12. Adhere roof and paint snow.
I used double stick tape for mine but was in a hurry and I ended up with small gaps. If you use double stick tape, take your time placing it and make sure it goes all the way to the edges of the flaps.

13. GLITTER!!!
Don't try to glitter the whole house at once. The glue will start to dry and you'll have a big mess. I did the roof first, then two sides of the house and then the other two sides.
You'll want to use a white glue that dries clear. Elmer's glue will do this as well as many craft glues. Don't worry if you have white splotches when you first put on the glitter. It will dry clear and be pretty!
 |
| white splotches of just applied glue and glitter |
 |
| once dry: no splotches, just pretty glitter! |
Tip: fold in half the sheet of paper that will be catching the excess glitter. This will give you a nice channel when pouring the glitter back into its container.
An alternate way to glitter if there are issues:
This will not give you as sparkly a house as regular glitter. However, if you don't want the mess or perhaps there are respiratory issues but you still want some sparkle, you can use glitter glue. Wait, before you get all "She's crazy/mental/whacked/on drugs", let me explain. You can apply the glitter glue with a brush like paint.

This is the result with cheap, old glitter glue that I had (and subsequently threw out, it was way too old). It's subtle and harder to photograph. The coverage is not as total as it is with regular glitter. Because of that, where there is just glue and no glitter, it's just shiny. I think I would have gotten better results with a better quality and newer bottle of glitter glue but, just to be clear, you will not get the same look as regular glitter. I'm just offering this alternative if you really don't want/can't use regular glitter.
WHILE YOU ARE WAITING FOR THE GLUE TO DRY
14. Determine where the visitor will be "resting"
This will be the OFF position. It will hang out here until you move it onto the circuit to turn it on.

15. Make feet for the base and adhere.
Because the battery is on the underside of the base, you need something to raise it up so it can sit on your mantel/table/floor nicely. First, I would encourage you to look around your house and see if there's something fun you could use for the feet. I'm talking about old game pieces, beads, wood scrap, bottle caps, anything with two flat surfaces that can hold the weight of the base and house.
I'm offering this component in case you don't. I used foam core again but you could use cardboard. You may only need one piece per foot but make sure you check it against the battery in its holder. It should be at least as thick to prevent wobbling.


Wrap the pieces the same way you did the base. You don't need a cover piece because you're gluing it onto the base.
 |
| foam core feet glued in place |
16. Put glitter on the base.
Double check to make sure the copper tape and Circuit Stickers are firmly adhered. Go over them again with a bone folder or the back of a spoon. Try to be careful when putting on the glitter so that you're not pouring the glitter directly over the circuit. I don't want you to freak out over this part, just be aware.

If you have some gaps, like I have in this picture, wait until you put the house on to determine if you want to add more glue and glitter. You may not have to but if you do, just add a little more glue and glitter.
Also, do not freak out when you see glitter where you don't want it, like on the circuit or the metal pieces. If I were smarter I could explain the physics of static electricity or whatever is happening. Just take a craft paint brush and brush it away.
Wait for the glue to dry before you.....
17. Adhere the house on the base.
Use the guidelines and adhere the house in place. I used hot glue because it adheres quickly. This is one circumstance I'm not all that sure double stick tape would work. There's just too much random glitter and I would be afraid it would hinder adhesion. This is just my unscientific opinion.

18. Do some yard work.
Have some fun and add trees, shrubs, plastic flamingos, a Tardis, any yard art you like. You can buy little trees like this:

 |
| I'll be posting a tutorial to show how I made them |
Look around your house and see if there's anything you can use. (I'm a big proponent of using what you have.) It's your creation and your story so have fun with it.
You are done!!!
Take a moment to marvel at your lovely little house and how clever you are. Now make twenty more! Remember to visit Howard Lamey's Little Glitter Houses web site for inspiration on how to modify your house and different landscaping you can do!


If you would like to see other projects I have made using Circuit Stickers as well as with general paper and soft circuit techniques, please take a look at my Paper & Soft Circuits page.
Have fun!!!
No comments:
Post a Comment