

I was determined to get my Thanksgiving napkin ring idea out in the world with enough time for people to do it for their own Thanksgiving dinner. I think I made it. Sorta. Kinda. You have to have some Circuit Stickers already at hand. However, if you don't, I've found shipping to be rather quick from Crowd Supply, Maker Shed and Adafruit.

If you've never heard of Circuit Stickers, they are basically stickers with LEDs on them. This is what they look like:

picture source: Crowd Supply
When paired with copper tape and a battery (a flat watch battery), you got yourself a circuit that will light up the LED. With this "system", you can add a little LED bling to your projects. You can learn more about these and other fun electronic stickers (yes, there's more!) at Chibitronic's website.
This tutorial-of-sorts is written for the person who has some experience with Circuit Stickers. However, I've tried to supply enough information that even if you've never used them before, you could pull it off. If I haven't been clear enough or you have any questions, please send me an email with the widget on the right side of the page or in the comments. There's always Christmas dinner....or Valentine's Day.....or Easter..... (Seriously, this can be used anytime.)

On to the Tutorial (of sorts):
Napkin Ring
I like to shop at home and use what I have if I can. In this case, I used a toilet paper tube.

I did two coats of a Terra Cotta color craft paint on both sides and then two coats with the gold on the outside only. Because they were in my stash, I don't know for sure if you can get the exact products I used but you really don't need the exact products. Plus, you may not like the gold color. Make it any color you like. (Also, I probably didn't need the Terra Cotta base coat.)
A note regarding cutting the tube: I first marked a line around the tube about 1-1/4 inch from the edge. Then I cut it with a craft knife because I wanted to keep the round shape. As I was making the prototypes, I found the shape really needs to be oval for a better contact for the Circuit Sticker and for the battery as well. So, just mark how wide you want it and cut it with scissors, don't worry about smooshing it a little.
Flowers
I didn't have these in my stash so I went to the Dollar Store! (Dollar Tree to be exact.)

These are from my second trip to the dollar store because I went through the first bunch making mistakes. I like the mauve-ish color but I liked the shape of the yellow ones so I stuck with them for this tutorial like project.
First,take a flower off the stem and you'll find a plastic base:

Take it off:

With these flowers, there was another plastic thingie on the innermost petals:

so I took that one off, too. (No picture, you get the idea.)
Next, glue them together. Do not panic when it goes from this:

all nice and fluffy (even without the plastic pieces)
to this:

a little bit flattened out
It's just the nature of the gluing process and not having the plastic pieces keeping them constrained. It's still very pretty. If you want a more fluffy looking flower, I have a couple suggestions that I put at the end (Addendum) because this tutorial was getting too long.
First, some glue talk.
I tried both Aleene's Tacky Glue and a hot glue gun. Both have their advantages and disadvantages.
- Aleene's Tacky Glue: Con: I couldn't glue all four layers at one time. I don't know why. This is my go to glue in non-paper situations like this. I had to glue two layers, wait a while, glue the next layer, wait, and glue the last layer. Pro: The center wasn't stiff like it was with the hot glue.
- Hot glue: Con: Center was stiff from the glue even though I used it sparingly. Pro: I could glue all four layers one right after the other.
Last, add a center feature:

I sadly thought just coloring the center may work

paper flower (found in scrapbook section of craft stores)

fabric flower (from another disassembled flower bouquet)

diy from paper (instructions in the Addendum)
You could also use a flower shaped craft punch or design your own flower shape and cut it out of paper or fabric. I sometimes buy fabric flower bouquets when they go on sale (like the end of season, 70 - 90% off) or at thrift stores and then strip the flowers and leaves off to use in craft projects. You can get a whole bunch of flower parts for a dollar or two.
The Circuit

I first marked where I wanted the LED to be with an awl prick (but you could use any marking mode) so I would know where to place the battery holder.

you can barely see it but the little awl hole is there
Then, on the opposite side, I set up the paper battery holder and the copper tape circuit paths.


battery holder closed
A couple notes on the battery holder. It is an adapted version of Jie Qi's paper battery holder. I needed the circuit paths to be opposite each other. Also, you will notice subsequent pictures of the battery holder to be different than the one above. That is because despite numerous versions and models and testings for the fit of the battery and making sure the paths were clear, the "final" version still needed tweaking.
However, I am happy to say the final final version works well. You can get a PDF of a sheet of the template I used by clicking the picture below:

If you've never worked with Jie Qi's paper battery holder before, check out her page that explains how to use her battery holder. Below is my lame attempt to explain:

This picture shows a close-up of the battery holder.
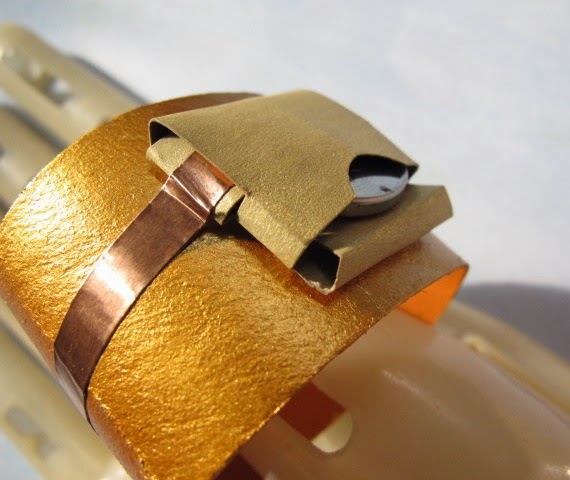
Which brings me to a note regarding this style of battery holder. The picture above shows the battery holder in the ON position. Because of the design, you can't really slip the cover above and below the copper tape path as easily as Jie's version. However, if you slip the cover under the battery, this not only opens the contact with the copper tape but provides the needed "tension" to keep the contact.
One caveat: don't push it in so far that it covers the copper tape on the bottom. You'll know because the LED will turn off. You can also fiddle with tweaking the cover and cutting it down so it doesn't do this. (You may have to do this anyway depending on what kind/weight of paper you use for the battery holder.)
Putting the pieces together
This is the easy part. Use hot glue to glue the flower to the paper ring for quickest results.

I also added leaves that I took off the bouquet and then cut apart.

These are not the leaves from the mum bouquet I bought. I thought they were. They were sitting on my table throughout this whole process with me thinking they were the mum leaves. I have no idea where they came from. I'm blaming menopause.
ETA: Hallelujah! I'm not going crazy! As I was cleaning off my work table, I found the original flower bouquet I bought and it has these type of leaves. The one I bought later has different leaves but since the original bouquet was buried under crap art materials and I just assumed they had the same leaves, I really was beginning (hah! beginning!) to question my sanity.


Wait! What's that gold pipe cleaner doing there?
I was watching "The Chew" (a food show) and Clinton Kelly (who's one of the hosts and yes, one of the "Queer Eye for the Straight Guy" guys) did a craft (so apparently it's a food show with an occasional craft segment). They made these leaf place cards which the guest could take home and use as a Christmas ornament.
Immediately I was consumed with the idea that the napkin ring should have this same feature. First, I tried to eliminate the napkin ring altogether but then that got into the "how do I attach the battery holder" quandry and with the countdown to Thanksgiving flying by, I decided to make a hanging attachment for the napkin ring.
You don't need to add this feature but if you like the napkin ring morphing into a Christmas ornament for guests idea, you can add a pipe cleaner (gold or otherwise). I also found the gold pipe cleaners at Dollar Tree.

fold over on one side and then twist to attach

bring it around and fold over on the other side and twist to attach

yay! a pipe cleaner ornament hanger!

you can also use ribbon if you have that around your house
I also added a little tag and tied it to the pipe cleaner hanger to write a name if you'd like to further enhance this to be a place card of sorts. (I didn't take a specific picture of this but you can see the scalloped edged paper tag on some of the pictures.)
Yay!!! You're done!!!!


Addendum
If you want fluffier flowers
Option 1: Gather all the layers, except the center one, by sewing a running stitch:

close-up of running stitch on the outside:

close-up of running stitch on inside:

then pull the thread to gather the stitches and fabric:


glue the center piece in place:

Voila! Fluffy flower!
The caveat to this option is that the LED will not seem as bright due to the layers of fabric:

vs

Although looking at these pictures it doesn't seem like there's any difference, there is. It's not a great difference, but the light is softer and diffuse. This may appeal to you more.
Option 2: Add more petal layers from other flowers in the bouquet. My final project uses this strategy. I added another bottom layer and another top layer.
vs
A make your own flower center possibility
Fringe some paper by cutting little slices with regular scissors or those fancy shmancy scissors you can get through Martha Stewart at craft stores. (American Science and Surplus used to have them but I don't see them currently but check out the web site anyway because it's a great resource for loads of things.)

Then, cut it off the parent sheet. (Don't make yourself crazy doing it the other way.)

Follow the instructions on the picture:

You get a flower that will look like this:
If you color the center with a marker that matches your paper, it will blend in better.
I can't find cheap fabric flowers around me!
Lia Griffith has a wonderful tutorial and template to make paper mums. Get thee to her post by clicking on this sentence! She uses colored text weight paper. I did a sample with white copy paper (text weight) and another with colored lighter weight card stock. You know how some card stock is really stiff and others are thicker than copy paper but not really stiff? That's the kind I used.
If you use text/copy paper weight, you can punch holes through all four layers or just the bottom three and leave the top one plain to get a diffused light.


If you use a heavier paper weight, you won't be able to curl the petals with scissors, like Lia describes in her tutorial. You'll have to use the curl around the pencil method.


WHEW!!
I hope I've given you enough information and options for you to make your own creations. Have fun coming up with your own versions with your own stash and creative process! As always, please feel free to contact me via the widget on the right side of the page or through the comments if you have any questions. Also, I would love, love, love to see your interpretation of this project if it inspired you to make it!
No comments:
Post a Comment